Crochet Pattern Designer
For the impatient, here's a project demo video.
I've been crocheting for somewhere between a year and ten (accurate at time of writing) and love following pattern diagrams - also called pattern charts by people who are not me. Most patterns are described with words, which is a very flexible way of conveying patterns, but pattern diagrams are almost entirely visual. They're constructed out of standardized symbols which describe different types of stitches in different configurations. Since my brain hates words and loves pictures, pattern diagrams help me understand the authors intention much more easily than written ones.
Motivation
As I got more interested in pattern diagrams I started wondering how people designed them. Surely there is specific software for this kind of thing, right? Well, there sorta is. I've heard of people using Photoshop and Illustrator, which give you great consistency and flexibility at the cost of time. There are also a couple webapps out there but they seem like they're all about dragging and dropping symbols around a canvas. There are also some that constrain stitches to a grid but I want something that is more expressive than that. When I started thinking about this diagram designing problem, I started envisioning a solution where stitches are actually attached to each other so that it's easier to get a consistent look without spending tons of time to get there. So I ventured out to create something like that.
I came up with a node-based system that anchors each stitch to its base so that it moves when its base moves. It also relates stitches to its parent and child stitches to provide a visual aid describing the "direction of crochet", which is something that traditional diagrams struggle to clearly depict. When creating stitches, I didn't want to emulate the "drag and drop symbols" approach that other software took, but instead let the user click and drag off of other stitches to create new ones. This, to me, emulates the experience of crocheting fairly closely (and in the end I found it very intuitive). I wanted the experience to feel like snapping Legos together: quick, satisfying, and visually consistent.
Tech of Choice
Since this project consisted entirely of shape drawing and mouse/keyboard interaction, I reached for my first programming love: Processing. Or, well, it's sibling JavaScript library p5.js. For the uninitiated, p5.js essentially wraps the HTML canvas element and provides greater drawing facilities, a drawing loop, input events, some handy math stuff, and more. It's really great for quick visualization projects and can even drive more substantial projects like this one, provided you put great effort into organizing your code.
Feature Set
I started out this project by sketching the handful of features that I knew would make up the core of the program:
- Be able to drag new stitches straight off of others
- Be able to move stitch heads while keeping them anchored to their base
- Allow stitches to be of any length
- Be able to change a stitch's base after placing it
- Creation of "composite anchors" which allow you to crochet into spaces between other stitches

Even though I would've been happy if I could just implement these core features, I still took great care to keep my code organized and reusable so that I could add more features as I went. As I started trying to create patterns using the core feature set, I quickly realized I wanted things like "group select" to move multiple stitches simultaneously, stitch insertion, pattern exporting/importing, more intelligent stitch drawing, and more. Because of some half-intelligent design decisions I made from the get-go, it was fairly easy to append most of these to the feature set.
For example, it didn't take long to get pattern importing/exporting running because of the compact way I represent stitches. Each stitch is represented as a Stitch object:
type Stitch = {
    pos: p5.Vector;
    parent: Stitch | null;
    base: Stitch | null;
    type: StitchType;
};
enum StitchType {
    Chain,
    SingleCrochet,
    HalfDoubleCrochet,
    ...
};
Note that a Vector in the p5 world is just an object with x and y coordinates and some utility functions
All the stitches in a pattern are stored as an array of Stitch objects and that's about it. From here, it was easy to convert this conceptual model of a stitch into a list of JSON objects. First, I emulated the references by ascribing ids to each stitch based on their index in the array, and mapped the Stitch | null values to number | null based on the id of the stitch they reference. Then I unpacked the pos value into x and y values. And finally I casted the StitchType enum to a number. The final "exported type" looks something like this:
type ExportedStitch = {
    x: number;
    y: number;
    parent: number | null;
    base: number | null;
    type: number;
};
Then it was as simple as stringifying the resulting array of objects to get a nice JSON file.
Now I know that all sounds like a lot of work but it really all came down to this concise bit of code:
function stitchesToJSON(stitches: Stitch[]): string {
    const exportableStitches = stitches.map((s) => ({
        x: s.pos.x,
        y: s.pos.y,
        parent: s.parent ? stitches.indexOf(s.parent) : null,
        base: s.base ? stitches.indexOf(s.base) : null,
        type: s.type,
    }));
    return JSON.stringify(exportableStitches);
}
The importing code is slightly more gross but not much more. Since the stitches contain references to other stitches, I had to construct them without their references initially, then go back and assign the reference values.
function jsonToStitches(jsonString: string): Stitch[] {
    const json = JSON.parse(jsonString);
    if (!Array.isArray(json)) throw new Error("JSON is not an array");
    // Construct stitches without references
    const stitches: Stitch[] = json.map((stitch: any) => {
        // ...assert all fields exist on object and they're of the correct types
        return {
            pos: p5.Vector.fromAngle(0).set(stitch.x, stitch.y),
            parent: null,
            base: null,
            type: stitch.type,
        };
    });
    // Assign references
    stitches.forEach((stitch, i) => {
        const imported = json[i];
        stitch.parent =
            imported.parent === null ? null : stitches[imported.parent];
        stitch.base = imported.base === null ? null : stitches[imported.base];
    });
    return stitches;
}
Note that I removed a lot of the JSON object validation because it's uninteresting. Check it out here if you're interested
Challenges
Ok remember how I was talking about how nice the simple Stitch representation is and how it makes other features easier to implement and all that? Well... There's one feature it sorta left dead in the water. I really want to add "composite anchors" which are spaces that stitches can be anchored to, defined by a set of other stitches. Right now a stitch can only have one other stitch as its base, but I would need something more abstract than that to create composite anchors. I'm thinking I can do it by representing a stitch base as a list of stitches... Then the stitch drawing code will need to determine a suitable place to anchor the stitch somewhere within the polygon that all those stitches define. I think I'll be saving that for a particularly rainy day when I'm feeling particularly masochistic.
Another challenge I'm running into that I haven't quite cracked is the issue of stitch spacing - or drawing stitches so they just butt up against their neighbors. Often times this comes down to one's own style and how dense you want to pack your stitches, how wide you draw them, etc... In other words, it's hard to tell a computer how to do it well. Each stitch has wide bits and narrow bits, so making sure they don't overlap in awkward ways is difficult. Here's an example of where I'm at right now:
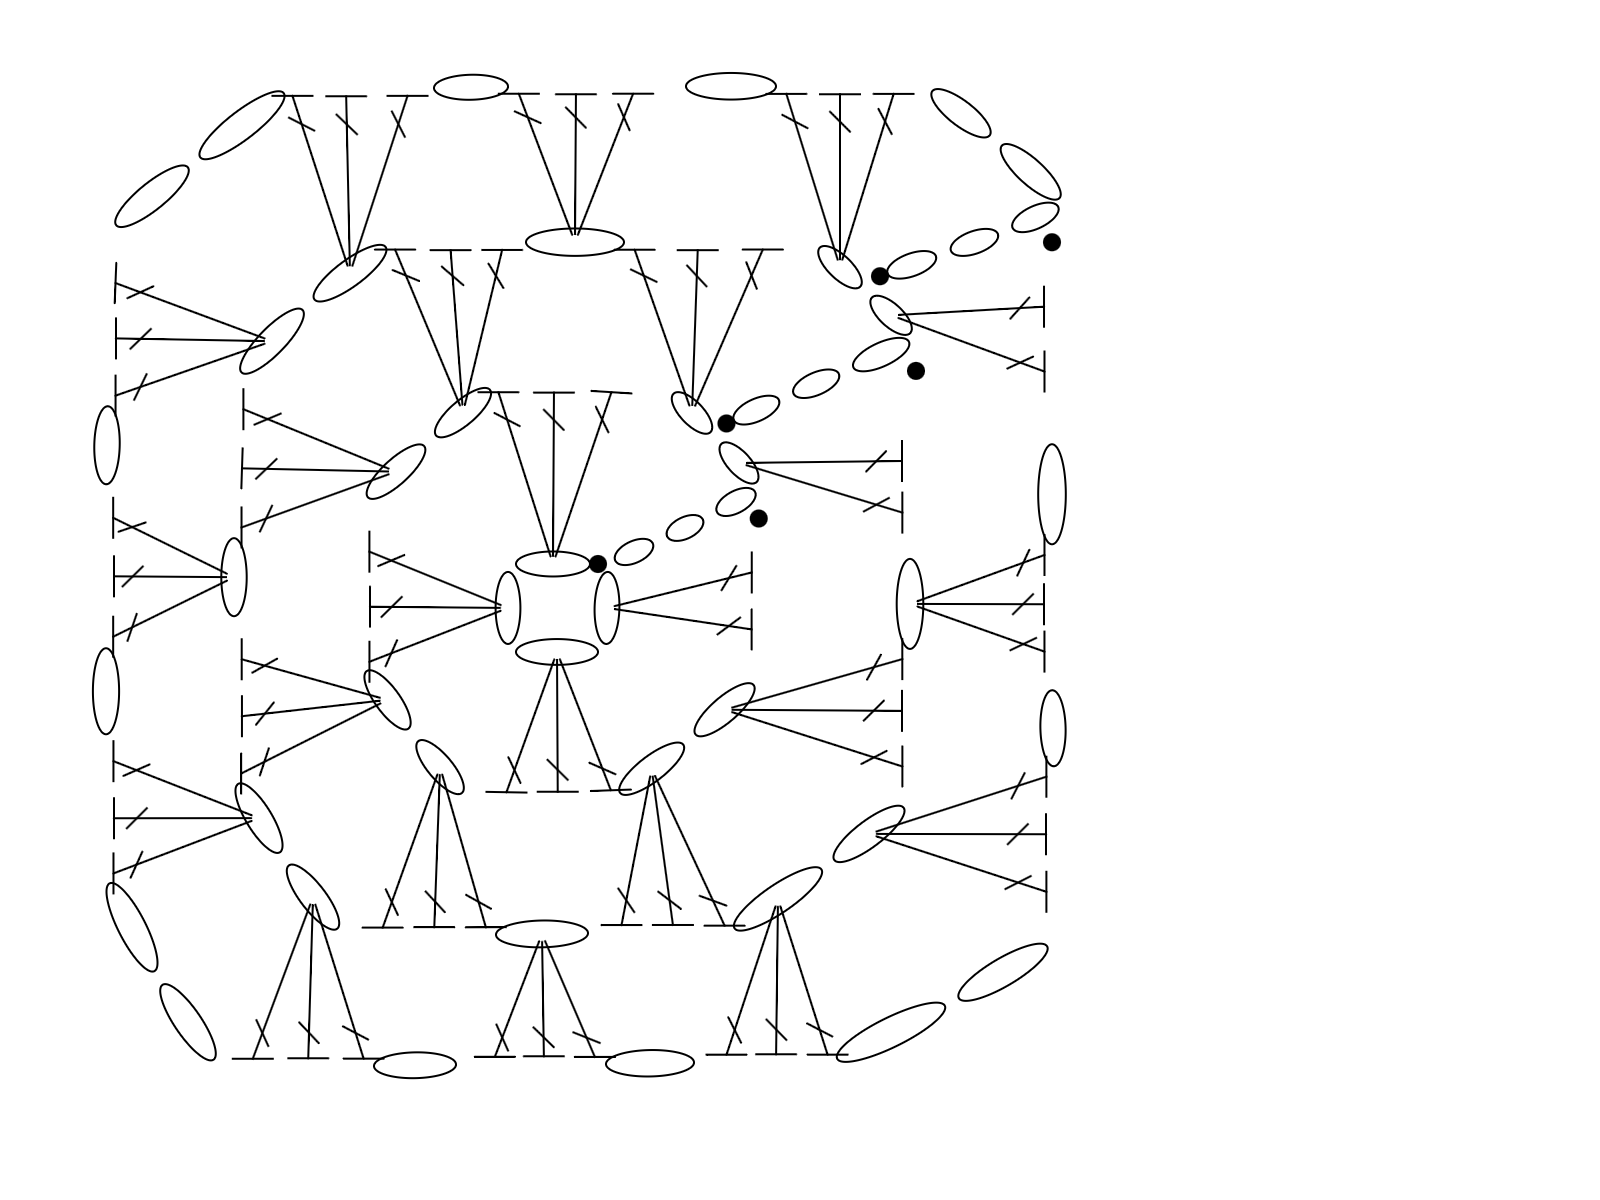
Notice how many of the stitch "tails" overlap the stitch they're anchored to, and many of the chain stitches (the ovals) are in awkward positions relative to their neighbors. This is a result of my attempt to space each stitch out by a constant distance. In the future, I hope to implement more dynamic spacing based on the two interacting stitch types to achieve a more natural look.
Then End?
I'll keep working on this project over time, probably. There's so much more I want to add to make it easier to use and produce nicer patterns, but I'm tired now so I'll circle back after I've had a good rest. If you want to check it out in its current state (which may be further along than what I've shown here) you can do so here. And here's the example pattern I showed earlier which you can import into the app to play around with.
signpost care to venture further?
Side Projects
tylerthompson.work - the website you're currently looking at